 Many Sydney residents would be familiar with the sight of the 'Manly Hydrofoils'
which operated from 1965 through to 1991, the modelling of one of which (the
Fairlight) is the subject of this article.
Many Sydney residents would be familiar with the sight of the 'Manly Hydrofoils'
which operated from 1965 through to 1991, the modelling of one of which (the
Fairlight) is the subject of this article.
The first hydrofoil would appear to date back to 1908 with models and experiments
by Alexander Graham Bell (and others) which resulted in the HD4 launched in
1918. More serious efforts were evident in the 1950's with the commercialisation
of the concept clearly moving into vogue in the 1960's and 1970's. Their role
is largely filled these days by the high speed and high capacity catamarans,
wave piercers and the like. But, whilst less common these days, they continue
operation around the world in Canada, around the Mediterranean and in other
usually enclosed waters.
Additionally, various Navies have operated hydrofoil patrol boats - offering
a stable platform for missiles and other exploding devices as well as offering
a significant turn of speed. The hydrofoil concept has been extended to speedboats,
sailing boats, windsurfers and waterskiing - none of which appears to have
really caught on.
In terms of Sydney's hydrofoils, there were four distinct Hydrofoil models
in operation. All were Italian in design from the Rodriquez shipyard. The
first arrived in Sydney in 1964 and was a single Japanese licence-built Supramar
PT20 with a capacity of 72 passengers named the Manly. It's introduction
caused a few ripples for the harbour administrators with some initial (thankfully
shortlived) restrictions on when and for how long it was permitted to get
up on foils. The public seemed to take to it - there would have been some
novelty value if nothing else and plans were made to extend the hydrofoil
fleet.
What followed was the purchase over a number of years was the purchase of
four Italian built Rodriquez PT50 with a capacity of 140 passengers. They
were named the Fairlight (1966), Dee Why (1970), Palm Beach
(1975) and Long Reef (1978). All of these had subtle differences certainly
around the superstructure.
A single Rodriquez RHS140, the Curl Curl (1973) was introduced with
a similar capacity to the PT50. The last type in Sydney was the much larger
RHS160F with two arriving, the Manly in (1984) and Sydney (1985)
each with a passenger capacity of 235. These were far more functional craft
but in my view lacked some of the pretty lines of the earlier ones.
 The
Rodriquez PT50 hydrofoils were constructed largely of welded aluminium for
both strength and weight reasons. The foils themselves were specifically steel
for strength. Engines were mid-mounted for weight distribution reasons. These
had long drive shafts reaching back to propellers mounted near the base of
the foils, initially in front, then shifted behind when they kept getting
damaged by harbour debris. There was seating for approximately 120 passengers
below deck - around 2/3 of these behind the engines, and 1/3 in a separate
cabin in the bow. A further 20-odd passengers could be accommodated in the
upstairs deck and on the 'back verandah'.
The
Rodriquez PT50 hydrofoils were constructed largely of welded aluminium for
both strength and weight reasons. The foils themselves were specifically steel
for strength. Engines were mid-mounted for weight distribution reasons. These
had long drive shafts reaching back to propellers mounted near the base of
the foils, initially in front, then shifted behind when they kept getting
damaged by harbour debris. There was seating for approximately 120 passengers
below deck - around 2/3 of these behind the engines, and 1/3 in a separate
cabin in the bow. A further 20-odd passengers could be accommodated in the
upstairs deck and on the 'back verandah'.
Limitations on both passenger numbers and their distribution were necessary
- the process of getting foil-borne was difficult and whilst the hydrofoils
were not necessarily underpowered, there were defined boundaries. The similarities
between aircraft and hydrofoil operations are of note and I make further mention
of this below.
Many of the books which cover the hydrofoils, suggest that the inner harbour
Circular Quay to Manly run was never really optimal for hydrofoil operation.
The demands on the mechanicals in becoming foil-borne, the short 9 minute
time on foils, the short 6 minute turn-around time at each end - all combined
to require high levels of preventative (and non-preventative!) maintenance.
A perhaps not dissimilar position to the wear and tear and maintenance issues
faced by short-haul airlines - except that hydrofoils have a 1 metre cruising
altitude.
An additional issue was the passenger capacity which at around 140 was significantly
less than the 1000 or so carried by the large ferries of the day. The hydrofoils
were only ever going to service a niche market - those who could afford the
higher fare, and with no inclination to savour the usually relaxing trip on
the ferry. There is perhaps an analogy here to a Concorde vs 747 decision
on the London to New York trip - cost vs time vs capacity.
With an aging fleet, persistent reliability problems and some perhaps dubious
industrial relations practices the hydrofoils were eventually replaced by
the "Jetcats" which saw the hydrofoils phased out by 1991. The Jetcats themselves
did not last out the decade with their own raft of reliability problems. The
current services are dominated by the large and fast double ended Ferries.
The Fairlight, Dee Why and Palm Beach were in 1988 cut up for
scrap at Sydney's Olympic site at Homebush - when it was little more than
water side wasteland. The Sydney, Manly (RHS160F), Curl Curl
and Long Reef, being newer vessels, were purchased back by Rodriquez
and shipped back to Italy in 1992. In Italy they were rebuilt, resold and
renamed and provide service generally in the Mediterranean, most still being
in service at the end of the century. The very first one - the PT20 Manly
has had a number of lives and was reportedly under restoration in 2000
for tourist type operations in Sydney Harbour. I haven't spotted it yet but
one can still hope!
Model Research
 The
hydrofoil is a modelling subject that I guess has always been of latent interest.
They were operating on the harbour in my youth, (it's a relative term), and
I recall having a ride just once in the early 70's. In fact, I still have
the souvenir postcard from that trip which is the colour scheme I selected
for modelling purposes. This has been supplemented over time with photocopies
from various library books of the Manly Hydrofoils in action.
The
hydrofoil is a modelling subject that I guess has always been of latent interest.
They were operating on the harbour in my youth, (it's a relative term), and
I recall having a ride just once in the early 70's. In fact, I still have
the souvenir postcard from that trip which is the colour scheme I selected
for modelling purposes. This has been supplemented over time with photocopies
from various library books of the Manly Hydrofoils in action.
The shift from 'just an idea' to workbench took a significant step forward
with my usual source of knowledge - the Internet. I started doing some research
on the Manly Hydrofoils, wanting to establish the manufacturer, some history
and the ultimate goal - a set of plans. As I always find with the Internet
- one thing leads to another and you end up following a trail which either
flourishes or peters out. In this case it was the former. There is an organisation
called the "International Hydrofoil Society", the members of which appear
to be a collection of engineers, old sea dogs, radio control ship modellers,
and a couple of dangerous individuals - usually Americans for some reason
- with a speedboat, a welder and a death wish! The site has copious information
on the history of the hydrofoil, historical photos, modelling photos and notes
(usually radio control) and details on current operations. I entered into
the foray by leaving a message on their message board - which bore almost
immediate fruit. Predictably, there are a few Aussies amongst the membership
and it was one of those (Martin Grimm) who kindly emailed me scans of a number
of sets of plans.
Another source of information on the Internet is the e-magazine 'Classic Fast
Ferries' which deals certainly with hydrofoils, but also catamarans, wave-piercers
and the like. The e-zine is free and all current and past issues can be downloaded
in PDF format - around 3-4MB each. Past issues have featured some specific
articles on the Manly Hydrofoils and their ultimate demise.
The Model
 With
a set of plans in hand, I then had to make a decision on scale. Not being
a seasoned ship modeller, I haven't actually arrived at a preferred ship scale
and was leaning in this case towards either 1:72 or 1:144 in keeping with
the similarly sized PT & Torpedo boats. I produced plans in both scales and,
through a process I'm still not entirely sure of ended up deciding on 1:72.
This was going to be a big project.
With
a set of plans in hand, I then had to make a decision on scale. Not being
a seasoned ship modeller, I haven't actually arrived at a preferred ship scale
and was leaning in this case towards either 1:72 or 1:144 in keeping with
the similarly sized PT & Torpedo boats. I produced plans in both scales and,
through a process I'm still not entirely sure of ended up deciding on 1:72.
This was going to be a big project.
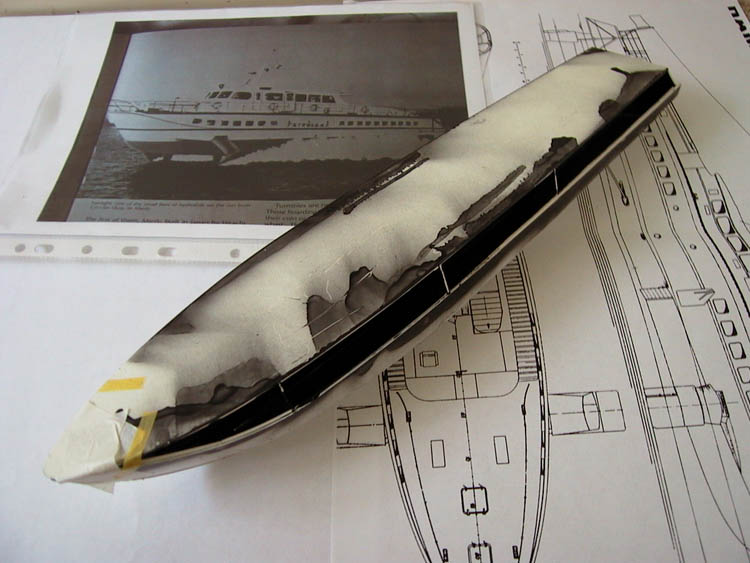
The logical construction sequence was determined to be the basic hull, to
which the superstructure would be then added, followed by the foils, deck
details and fittings. I commenced construction of the hull using the 'skeleton'
technique. This consists of a single central (vertical) spine, with 4 cross
section 'ribs' roughly equidistantly placed along this spine. The skeleton
was then skinned with thin sheet styrene of around 1mm. These were cut to
size and laid down in 3 planes on each side, to complete the hull - and a
single plane for the deck itself. The plane into which the hull windows were
to go was fitted with a full length clear styrene sheet rather than white
styrene - the intent being to mask off the windows later when painting.
 It
would be obvious from the above, that there has been no interior detail installed
below deck. The prospect of scratchbuilding 120 odd individual seats with
armrests was not the sort of thing I was going to get a kick out of for starters.
The interior detail would only complicate the construction - and besides,
none of it would be visible from the outside in 1:72 scale anyway. To make
absolutely sure it wasn't visible, I painted all the internal parts of the
skeleton black prior to fitting the skin.
It
would be obvious from the above, that there has been no interior detail installed
below deck. The prospect of scratchbuilding 120 odd individual seats with
armrests was not the sort of thing I was going to get a kick out of for starters.
The interior detail would only complicate the construction - and besides,
none of it would be visible from the outside in 1:72 scale anyway. To make
absolutely sure it wasn't visible, I painted all the internal parts of the
skeleton black prior to fitting the skin.
Note that in later steps of construction, I did in fact end up opening up
sections of the deck under the superstructure and did include some basic internals
at that point.
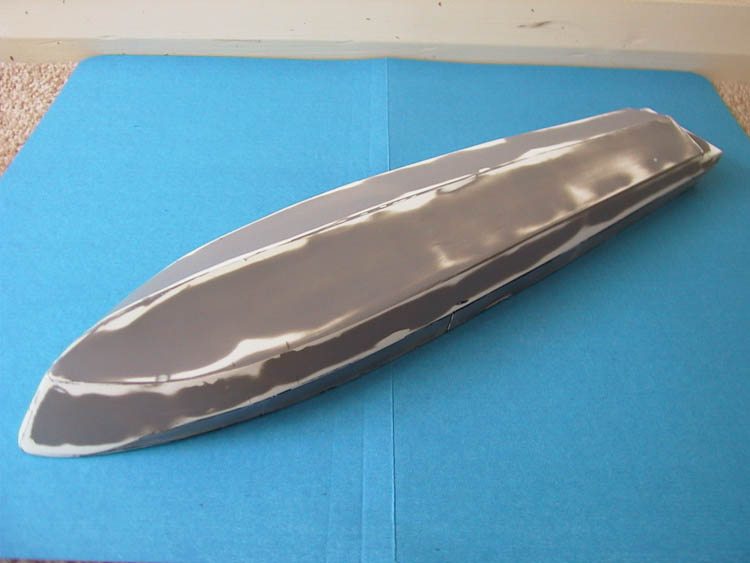
The resultant hull was cleaned up with Milliput and sandpaper. Mounting holes
were drilled out for exhausts, fenders, anchors and the other do-dads. The
various buffer or reinforcing strips along the length of the hull were added
using strip plastic.
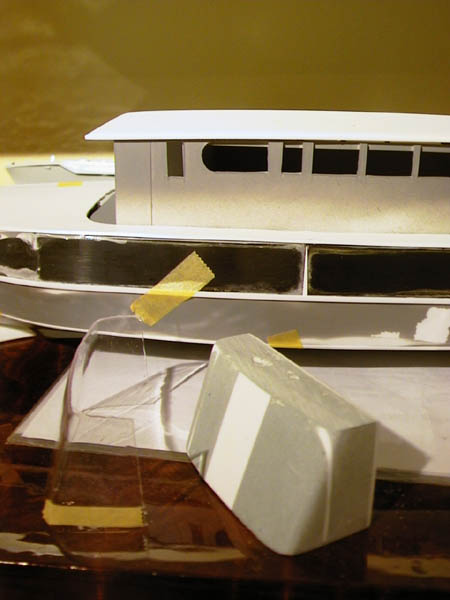
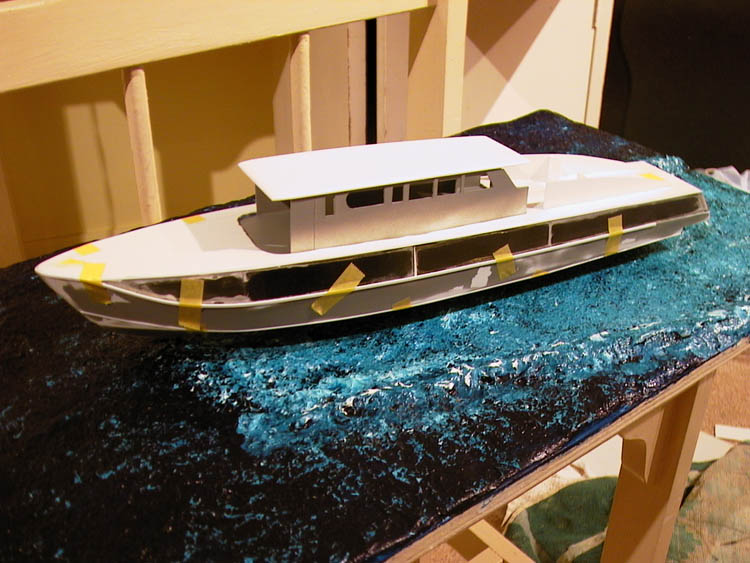 The
superstructure required a level of planning. It's basic shape is a simple
box, however there are curved windows at the front, a curved roof and of course
the large picture windows. I elected to construct port and starboard walls
as a 'sandwich'. The inner surface being 1mm styrene with the window and positions
cut out. The outer surface being 0.5mm clear styrene laid over the complete
inner surface. This technique provided some structural rigidity as well as
a bit of depth. The front of the wheelhouse is curved and I plunge moulded
this from clear butyrate. The roof is sheet styrene - lightly bent and sanded
to get the right curvature.
The
superstructure required a level of planning. It's basic shape is a simple
box, however there are curved windows at the front, a curved roof and of course
the large picture windows. I elected to construct port and starboard walls
as a 'sandwich'. The inner surface being 1mm styrene with the window and positions
cut out. The outer surface being 0.5mm clear styrene laid over the complete
inner surface. This technique provided some structural rigidity as well as
a bit of depth. The front of the wheelhouse is curved and I plunge moulded
this from clear butyrate. The roof is sheet styrene - lightly bent and sanded
to get the right curvature.
The upper deck interior is visible in 1:72 and needed to carry the light,
airy feel visible in photos. There are some 24 seats inside for which I was
able to modify the seats from two Italeri's civilian JU52 kits. One of these
JU52's I'd previously modified for another project - and I guess I'll now
have to do the same with the remains of the second one! These seats were painted
two shades of  blue
per the reference photos I had been provided. Also fitted inside were the
two stair wheels down to the forward and aft cabins respectively. The interior
I painted morbid grey and fitted various placards warning of the dangers of
smoking, blocking stairwells, not standing up for adults, eating, drinking,
sitting and standing and other misdemeanours.
blue
per the reference photos I had been provided. Also fitted inside were the
two stair wheels down to the forward and aft cabins respectively. The interior
I painted morbid grey and fitted various placards warning of the dangers of
smoking, blocking stairwells, not standing up for adults, eating, drinking,
sitting and standing and other misdemeanours.
 The
'rear verandah' is a relatively straightforward construction - with two curvaceous
rails running down almost to the stern, and an assortment of safety equipment,
lockers and a few seats. I constructed this as a unit, which was then recessed
into the deck to provide the necessary effect.
The
'rear verandah' is a relatively straightforward construction - with two curvaceous
rails running down almost to the stern, and an assortment of safety equipment,
lockers and a few seats. I constructed this as a unit, which was then recessed
into the deck to provide the necessary effect.
Railings are in real life stainless steel and fairly substantial - probably
trying to protect the public from themselves I guess. I firstly marked up
and pre-drilled holes for all the posts and support stanchions. Multiple posts
were then cut to size from Plastruct 0.1mm rod and fitted into position with
a dab of superglue. Working in sections, I then fitted the top rail - again
using a dab of superglue. 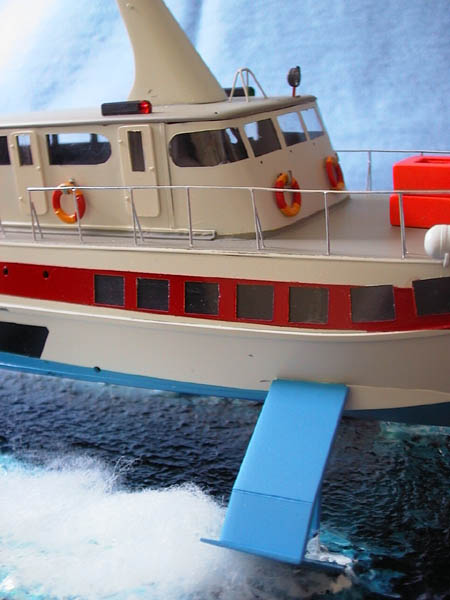 Middle
and lower rail were made from superfine stretched sprue. The bowsprit was
made from bent fusewire. All the railings were then handpainted with silver
paint to imitate the stainless steel.
Middle
and lower rail were made from superfine stretched sprue. The bowsprit was
made from bent fusewire. All the railings were then handpainted with silver
paint to imitate the stainless steel.
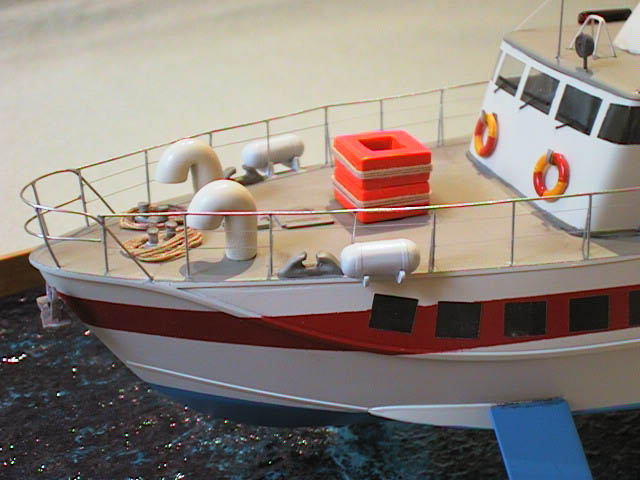 Ventilators
were scratchbuilt by bending thick sprue - then cutting/drilling to size.
I had about a 50% failure rate with these. It is difficult getting a 180 degree
bend in stretched sprue without it 'bunching up' on itself.
Ventilators
were scratchbuilt by bending thick sprue - then cutting/drilling to size.
I had about a 50% failure rate with these. It is difficult getting a 180 degree
bend in stretched sprue without it 'bunching up' on itself.
The usual aerials, navigation lights, foghorns and the like are fitted. Navigation
lights were made using clear sprue, filed and sanded to the required shape
- then painted red or green using the Tamiya range of translucent paints.
Aerials are from fine stretched sprue. Foghorns are from the tapered bit at
the end (or is that the beginning?) of stretched sprue. Rear stairs were constructed
from 90 degree right angle strips for the individual steps, with railings
added from bent fuse wire.
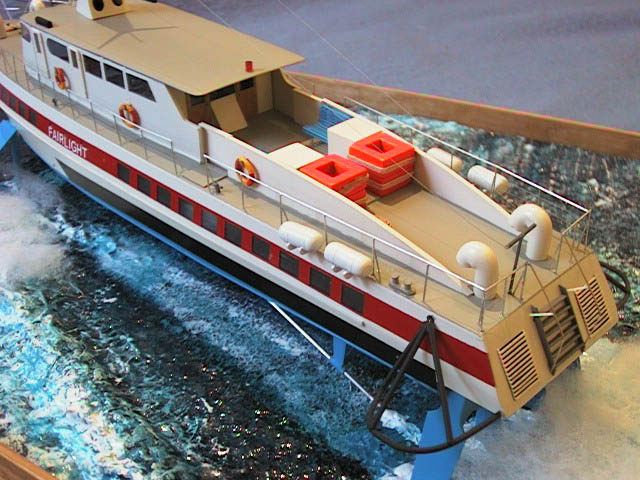
The Fairlight I was modelling had 6 Liferaft containers (I'm sure they
have a technical name!) mounted just outboard of the railing. These were scratchbuilt
using thick sprue with the ends rounded off, and details added from tape and
cut to size plastic. 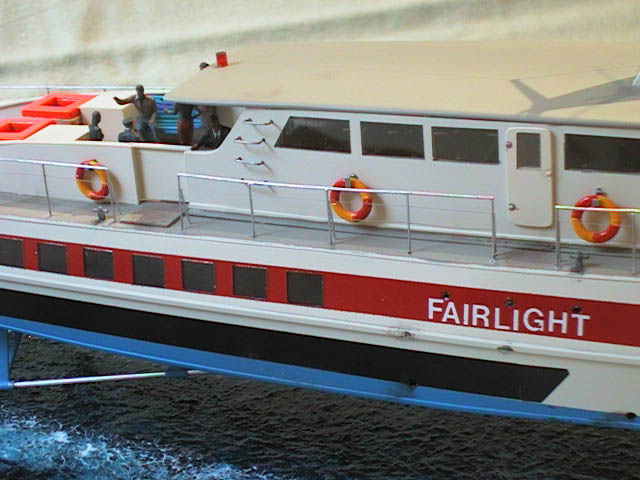 Life
Preservers are modified 'Billings Boats' accessories as is the anchor. The
various bollards and fairleads were mostly modified items from other kits.
Life
Preservers are modified 'Billings Boats' accessories as is the anchor. The
various bollards and fairleads were mostly modified items from other kits.
The deck was also fitted with some 'floaties'. 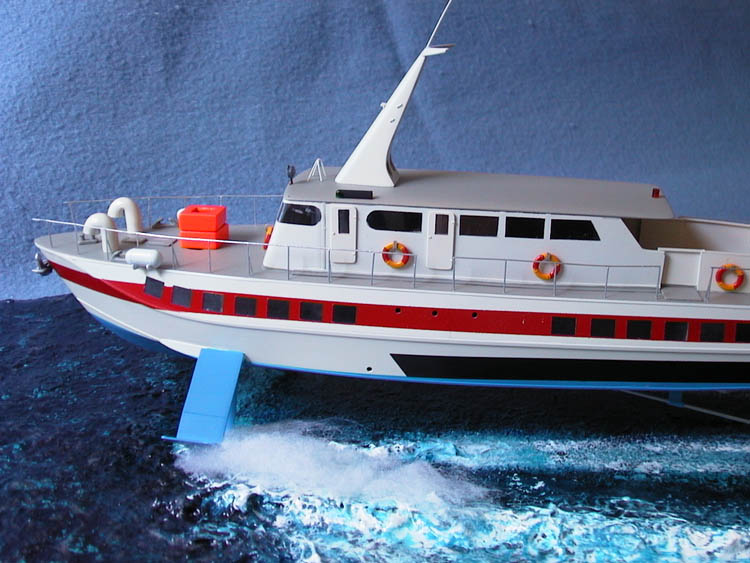 These
are like square donuts, roughly 1 metre across, with ropes on the side. Presumably
if the ship goes down these just float off and all the survivors grab hold
of these until help arrives. The hydrofoils seemed to have been fitted with
extensive levels of safety equipment - everything except seatbelts and airbags
it seems. I'm not entirely sure whether these safety levels were commensurate
with the risk or were just there to satisfy some government authority.
These
are like square donuts, roughly 1 metre across, with ropes on the side. Presumably
if the ship goes down these just float off and all the survivors grab hold
of these until help arrives. The hydrofoils seemed to have been fitted with
extensive levels of safety equipment - everything except seatbelts and airbags
it seems. I'm not entirely sure whether these safety levels were commensurate
with the risk or were just there to satisfy some government authority.
There is an article on the IHS website which discusses the effect of a hydrofoil
hitting a floating log of wood at speed - very technical, but basically it
stops.
After much deliberation, I decided that I'd put a few people on the 'back
verandah' - 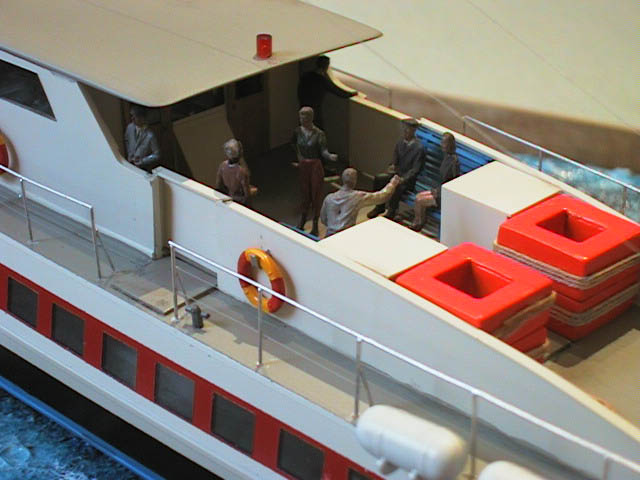 enjoying
the scenery - and a captain at the wheel (always a good idea). 1:72 people
are easy to come by from other kits - most of them however are either wearing
guns, helmets, breathing apparatus, jack boots or similar encumbrances none
of which seemed entirely appropriate on the deck of the Fairlight.
Cleaning up these 1:72 figures to make your average commuter is not an easy
task - so
enjoying
the scenery - and a captain at the wheel (always a good idea). 1:72 people
are easy to come by from other kits - most of them however are either wearing
guns, helmets, breathing apparatus, jack boots or similar encumbrances none
of which seemed entirely appropriate on the deck of the Fairlight.
Cleaning up these 1:72 figures to make your average commuter is not an easy
task - so 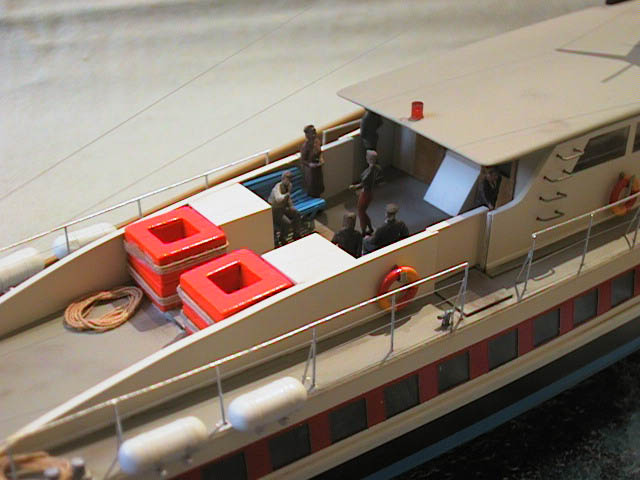 I
was hunting for alternatives. Having browsed through an extensive range of
1:72 figures it is surprising just how few bear any resemblance to your normal
everyday commuter. I ended up resorting to the model railway range (and the
model railway prices!) to get some finely detailed, 70's dressed figures in
various poses (and a few poseurs as well). Most of these were 'identical quadruplets'
which limited the range I could realistically use. I ended up putting about
6 of these on the deck - although I have none inside the cabins. Figures are
not my forte, (in fact I've never done a model figure in my life), but I think
they'll pass muster.
I
was hunting for alternatives. Having browsed through an extensive range of
1:72 figures it is surprising just how few bear any resemblance to your normal
everyday commuter. I ended up resorting to the model railway range (and the
model railway prices!) to get some finely detailed, 70's dressed figures in
various poses (and a few poseurs as well). Most of these were 'identical quadruplets'
which limited the range I could realistically use. I ended up putting about
6 of these on the deck - although I have none inside the cabins. Figures are
not my forte, (in fact I've never done a model figure in my life), but I think
they'll pass muster.
Weathering was kept a little constrained. Limited to running a wash of oil
paint along key joints and around the railing with some use of pastels to
'dirty things up a bit' particularly the trafficable parts of the deck.
 The
Base
The
Base 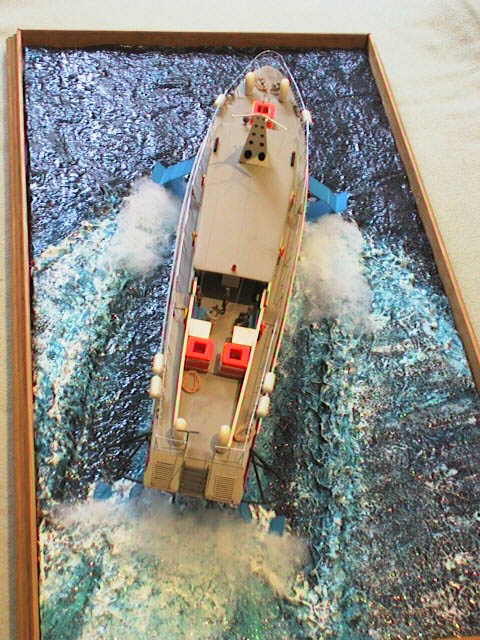
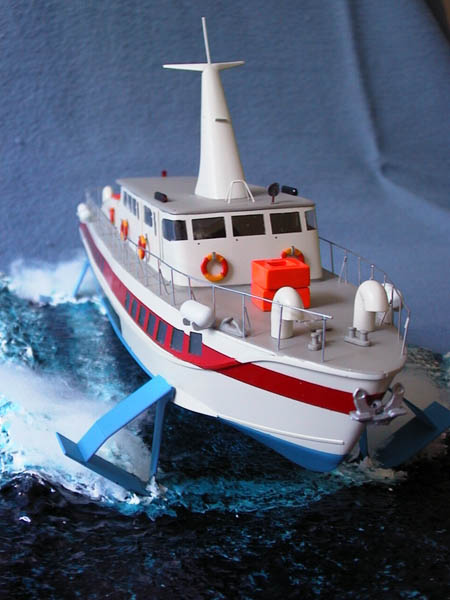
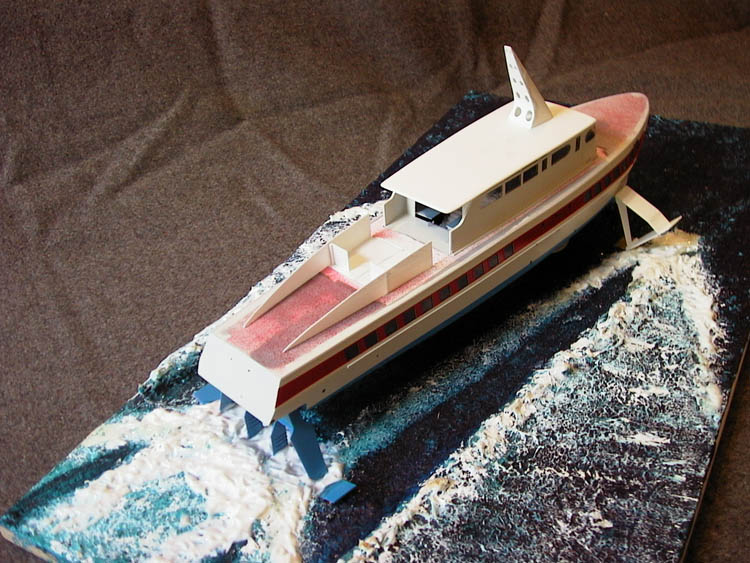
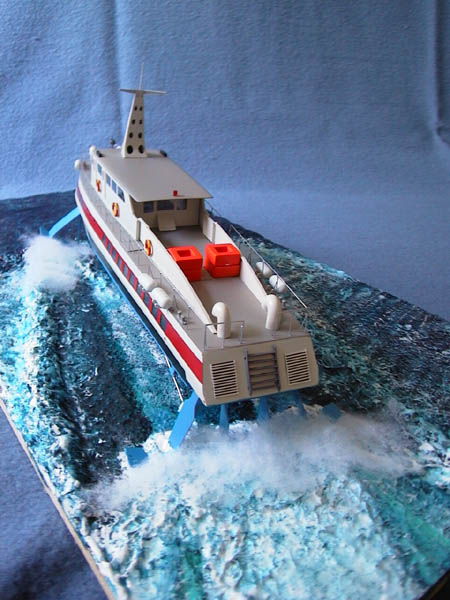
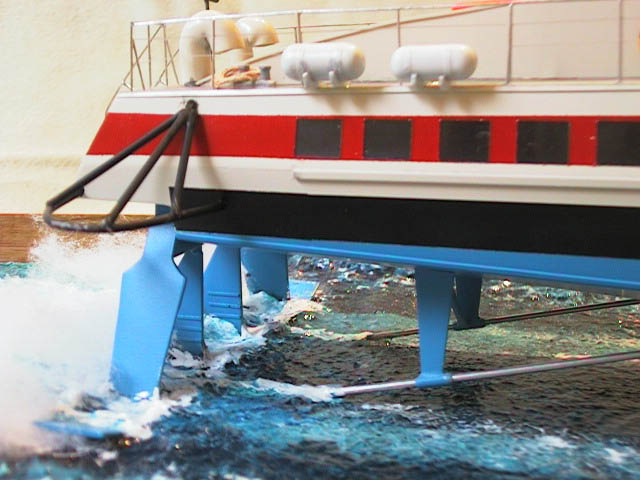
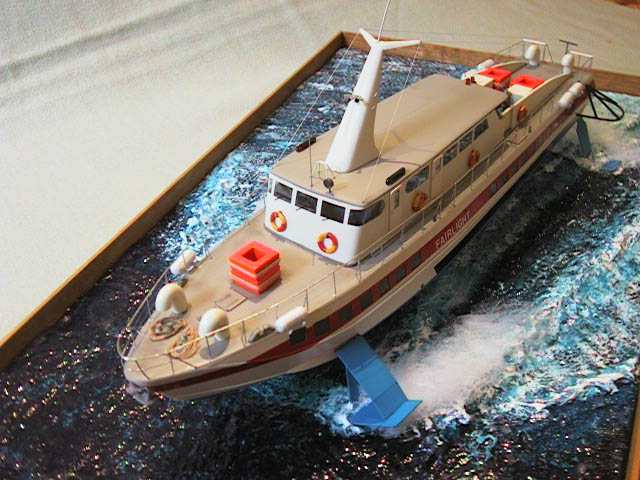
At an early stage I decided I would construct the model as a 'waterline' model.
That is 'foil-borne waterline' rather than 'broken down waterline'. The foils
themselves are quite large and really disrupt the voluptuous Italian lines
of the hull if not appropriately buried in the water. I wanted something that
would convey the Fairlight as most people would probably remember the
hydrofoil operations.
From a construction sequencing perspective, I knew I would not be able to
complete the base after the model was completed - it'd be too hard to access
the area underneath the foil-borne hull. Additionally, I had to convincingly
"bury" the foils in the water. This meant I had to be working with a largely
pre-prepared base.
The 'water' obviously presented some challenges to get any reasonable representation
of the 35 knot speed and the associated wake patterns and spray. Most of the
Hydrofoil pictures I had were photogenically front 3 quarter or side views
taken from the water or harbour foreshores. Again, via the trusty Internet,
I was able to source some aerial shots of the Dee Why at speed, presumably
taken from the Harbour Bridge, if not a helicopter. The Hydrofoil produces
a complex wake pattern - the nature of which has no doubt produced a number
of PhD theses! Obviously from the photos there is much evidence of froth and
stirred up water, varying amounts of spray (actually very little 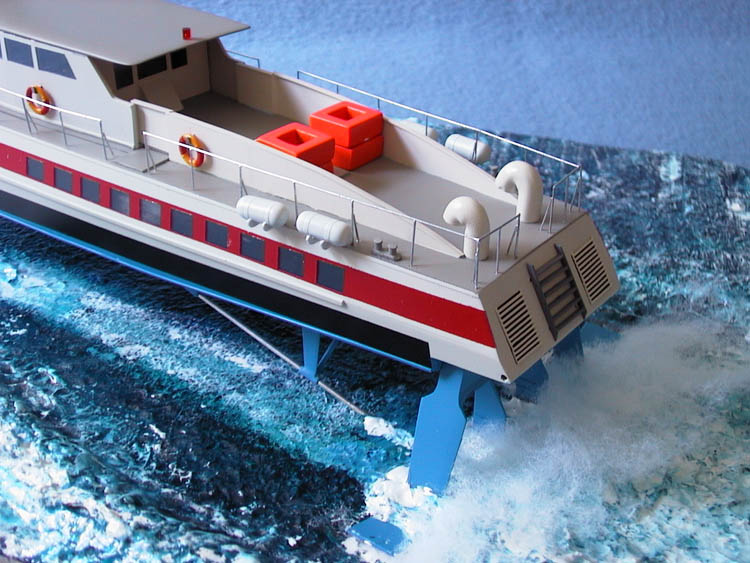 when
properly trimmed in smoothish water).
when
properly trimmed in smoothish water).
 The
modelling technique I used for the water was one I sourced from the Internet
- check out the SMML archives from for the full detail, I just give a shortened
version below.
The
modelling technique I used for the water was one I sourced from the Internet
- check out the SMML archives from for the full detail, I just give a shortened
version below.
The base board is a piece of 10mm ply cut to a 600mm by 300mm rectangle. This
is big enough to position the model in a representative bit of wake without
the model being overwhelmed. I marked out the position of the model and the
'swathe' the foils cut out of the water for most of its length. The remainder
of the board was built up by about 5mm with white modelling clay. This was
built up a little higher aft of the rear foils and also in a reverse V from
the front foils (sort of a bow wave I guess).
Once dry, I then started further building up water patterns and wake patterns
using Artists Acrylic Gel Medium. This (and all the other materials mentioned
here) can be sourced from any reasonable 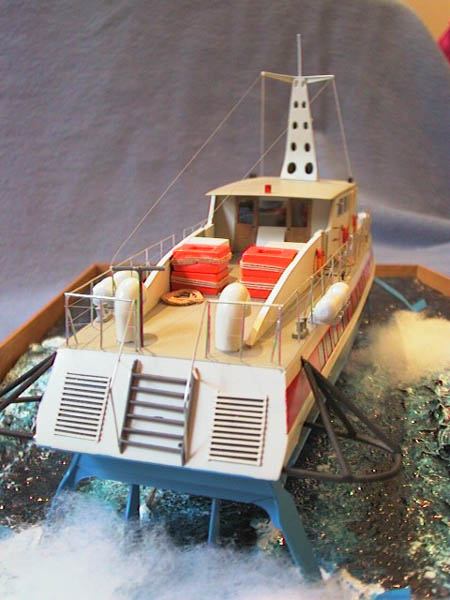 artists
supply store. The Gel Medium is normally used by artists wants to 'texture'
their paintings to create certain 3D effects. It looks a little like gluggy
PVA glue, the texture is a little like toothpaste and it dries crystal clear.
You apply it using either a flat brush, a spatula or anything you've got handy.
You then work it usually with smaller brushes to achieve particular effects
- such as a 'curling' wavelet. Most of the base was the largely undisturbed
water in front of the hydrofoil - for which I used a loosely scrunched up
plastic bag which I randomly dabbed all over the surface. This "pulls up"
the gel and leaves a noticeably mottled effect on the surface.
artists
supply store. The Gel Medium is normally used by artists wants to 'texture'
their paintings to create certain 3D effects. It looks a little like gluggy
PVA glue, the texture is a little like toothpaste and it dries crystal clear.
You apply it using either a flat brush, a spatula or anything you've got handy.
You then work it usually with smaller brushes to achieve particular effects
- such as a 'curling' wavelet. Most of the base was the largely undisturbed
water in front of the hydrofoil - for which I used a loosely scrunched up
plastic bag which I randomly dabbed all over the surface. This "pulls up"
the gel and leaves a noticeably mottled effect on the surface.
 The
water colour itself I've used by building up and blending three colours. These
are good quality Artists Acrylics which you can buy in a small tube. Not cheap
- but they last forever. Phthalocyanine Blue, Phthalocyanine Green and White.
The extremes of usage here are from; undisturbed water which is largely 3
parts Blue, 1 part Green; the prop wash which is probably 1 part Green, 3
parts white. Measurement and precision is not important. The scrunched up
plastic bag again comes in handy for blending and texturing - noting that
the effect here turns out to be far more subtle than you get with the gel.
Finishing off with some dry brushed white picks up some of the spray effect.
The
water colour itself I've used by building up and blending three colours. These
are good quality Artists Acrylics which you can buy in a small tube. Not cheap
- but they last forever. Phthalocyanine Blue, Phthalocyanine Green and White.
The extremes of usage here are from; undisturbed water which is largely 3
parts Blue, 1 part Green; the prop wash which is probably 1 part Green, 3
parts white. Measurement and precision is not important. The scrunched up
plastic bag again comes in handy for blending and texturing - noting that
the effect here turns out to be far more subtle than you get with the gel.
Finishing off with some dry brushed white picks up some of the spray effect.
The final effect I applied (and I'm still not 100% on its effectiveness) was
to apply behind the foils some 'fluff' - being much stretched out polyester
cushion fillings (looks a bit like cotton wool only not nearly so clumpy).
Painting
 From
a colour scheme perspective, the hydrofoils carried a variety of schemes.
Each of the hydrofoils appears to have had three or more 'major' makeovers
in their lives, supplemented by numerous changes in details of colour or fittings.
The extent of this is such that despite having numerous photos of the Fairlight,
I'm pretty sure that no two are alike! The drawings presented are of Fairlight
at some point in the 1970-73 period but I cannot be more precise than that.
From
a colour scheme perspective, the hydrofoils carried a variety of schemes.
Each of the hydrofoils appears to have had three or more 'major' makeovers
in their lives, supplemented by numerous changes in details of colour or fittings.
The extent of this is such that despite having numerous photos of the Fairlight,
I'm pretty sure that no two are alike! The drawings presented are of Fairlight
at some point in the 1970-73 period but I cannot be more precise than that.
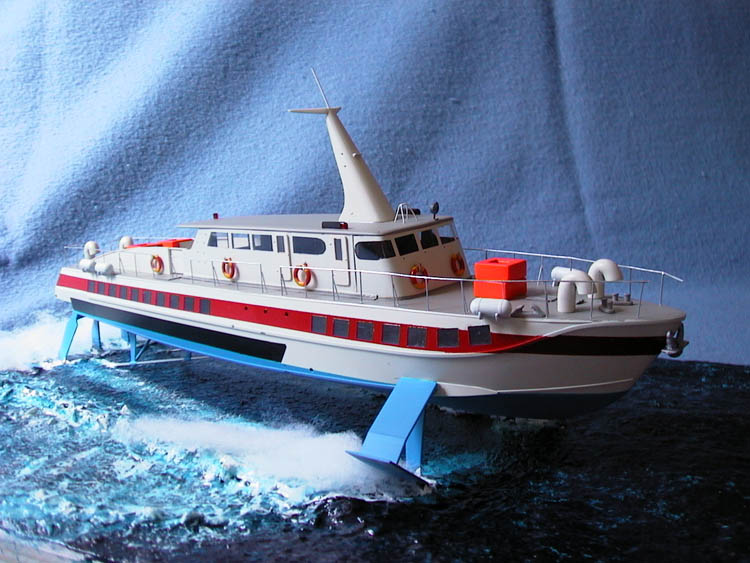
The colour scheme was overall white, with light grey deck and roof. Hull underside
is medium blue (almost a French Blue), with a bright red stripe down the side
of the hull. There is a thick black stripe mid-hull which runs from the engine
exhausts through to the stern - presumably to cover exhaust marks?
Postscript
All in all, this has been a challenging but interesting project. I've picked
up a few more techniques and knocked off one of those subjects I've always
wanted to do. The logical follow-on is I guess a Manly Ferry - something like
the South Steyne - although I'm quite sure I won't do THAT in 1:72.
Reference
· Manly Ferries of Sydney Harbour, Tom Mead ISBN 0909089124
· International Hydrofoil Society web site at http://www.foils.org
· Classic Fast Ferries e-zine at http://classicfastferries.com
· SMML archives for wake modelling techniques